Workspace
Projects
A chapter-style introduction to WEEMS Projects, including the dashboard, project creation, workspace setup, analysis, and notebook export.
Learn chapter
Projects are the home base for each study in WEEMS. This chapter shows how the hub, notebook, files, compute, and export flow fit together so you can move from setup to analysis without losing context.
Audience
This guide assumes you are already comfortable with coding, machine learning basics, and routine IT setup. We stay focused on how WEEMS organizes the work.
In this chapter
- Understand the Projects mental model.
- Set up a project with a notebook, files, and compute.
- Run the analysis inside the notebook workspace.
- Export a reusable notebook and continue in the right next surface.
On this page
What Projects are
On this page
What Projects are
On this page
What Projects are
Projects are the top-level container that keeps the work attached to one workspace.
A project groups the notebooks, uploaded files, search results, and workflow context that belong together. Instead of scattering assets across separate screens, WEEMS keeps them tied to the project so the workspace stays easy to reason about as the work grows.
The practical mental model is simple: Projects hold the context, Canvas is where notebook work happens, and the supporting tools in the workspace help you move from setup into execution without losing your place.
How to think about the product
If you are new to WEEMS, start by learning the relationship between projects, canvas, notebooks, and blocks. Those four concepts explain most of the workspace behavior.
Project hub
The hub is where you create, reopen, search, and archive work without leaving the project context.
The project hub is deliberately simple. It is not where the notebook work happens, but it is the place that makes the work easy to pick back up later.
When the workspace gets larger, the hub keeps the important entry points visible so you do not have to hunt for the right project, notebook, or file set.
- Create a new project when you are starting a fresh study.
- Reopen recent work when you want to continue where you left off.
- Search across projects, notebooks, and files when the workspace grows.
- Archive or restore projects to keep the active list focused.
Practical rule
Use Projects to enter and organize the workspace. Once the notebook is ready, Canvas becomes the main place to work.
Set up the workspace
Create the project shell first, then attach the notebook, files, and runtime.
Before you start
The cleanest project setup happens when the notebook, files, and machine are all attached before you begin code-heavy work. That way the workspace already has the right context when you start running the notebook.
Create the project
Open Projects, choose create, and name the workspace around the study you want to build.
A named project keeps the notebook, files, and runtime context together, so you can return later without rebuilding the workspace from scratch.
This is the right place to create the project shell before you begin notebook work.
Add a notebook
Create or open a notebook inside the project so you have a place to write narrative, code, and outputs together.
Projects organize the workspace, but notebooks are where the analysis actually takes shape.
Once the notebook exists, Canvas can treat it as the active document for the rest of the workflow.
Add files
Upload or attach the dataset and any supporting files so the notebook can reference them directly.
Keeping files in the project makes the analysis reproducible and easier to revisit later.
Upload the dataset and any supporting assets before you begin the notebook work so the references stay local to the project.
Start the machine
Open the machine controls and start the runtime before you move into execution.
You do not need the machine for every action, but you do want it ready before you begin the notebook steps that execute code.
Starting it here keeps the rest of the walkthrough smooth and predictable.
Order matters
Starting compute early avoids interruptions once you reach the code blocks. It is easier to begin with a live runtime than to interrupt the notebook mid-flow.
Run the analysis
Move through the notebook with a clear sequence: load, inspect, train, test, and evaluate.
Stay structured
Treat the notebook as a technical document. Add the code in the order that explains the work, not just the order that makes the cells run.
Load the dataset
Insert a code block, import the dataset, and confirm that the notebook can access the house-price data.
This is the handoff from project setup into real analysis work.
The notebook should now contain executable code and a loaded dataset that the rest of the workflow can build on.
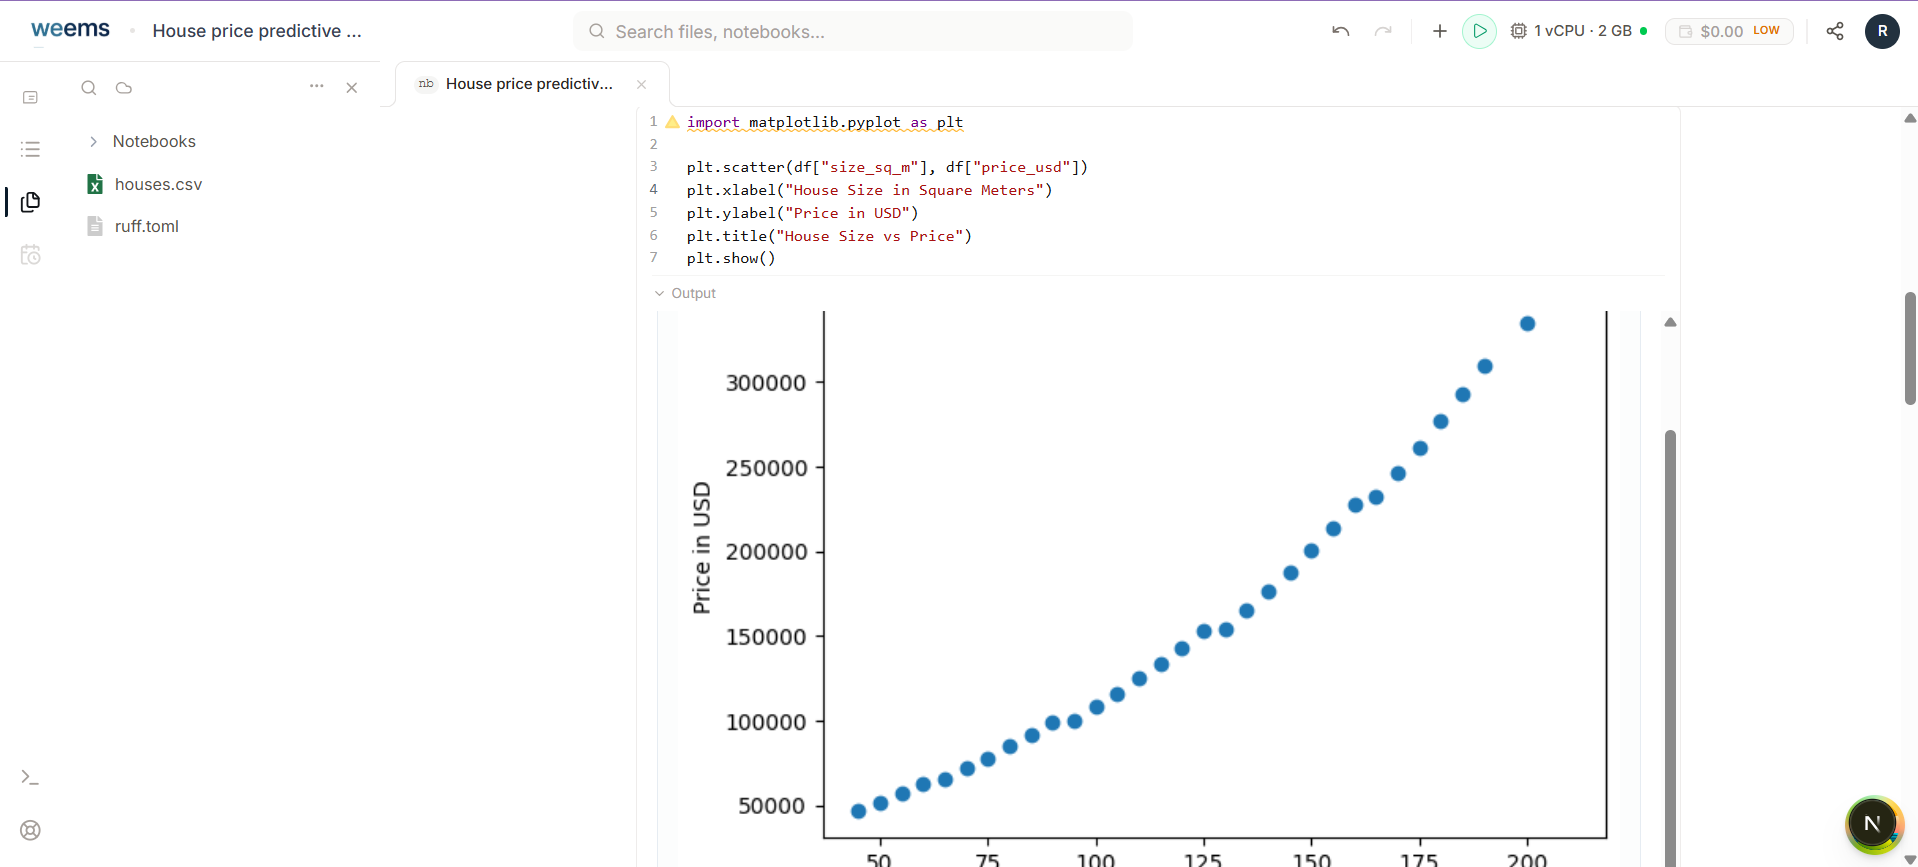
Visualize the data
Run the plotting code so you can see how house size and price relate before you fit the model.
A quick plot helps you validate the shape of the data and spot obvious patterns early.
This keeps the notebook honest before you spend time training a model.
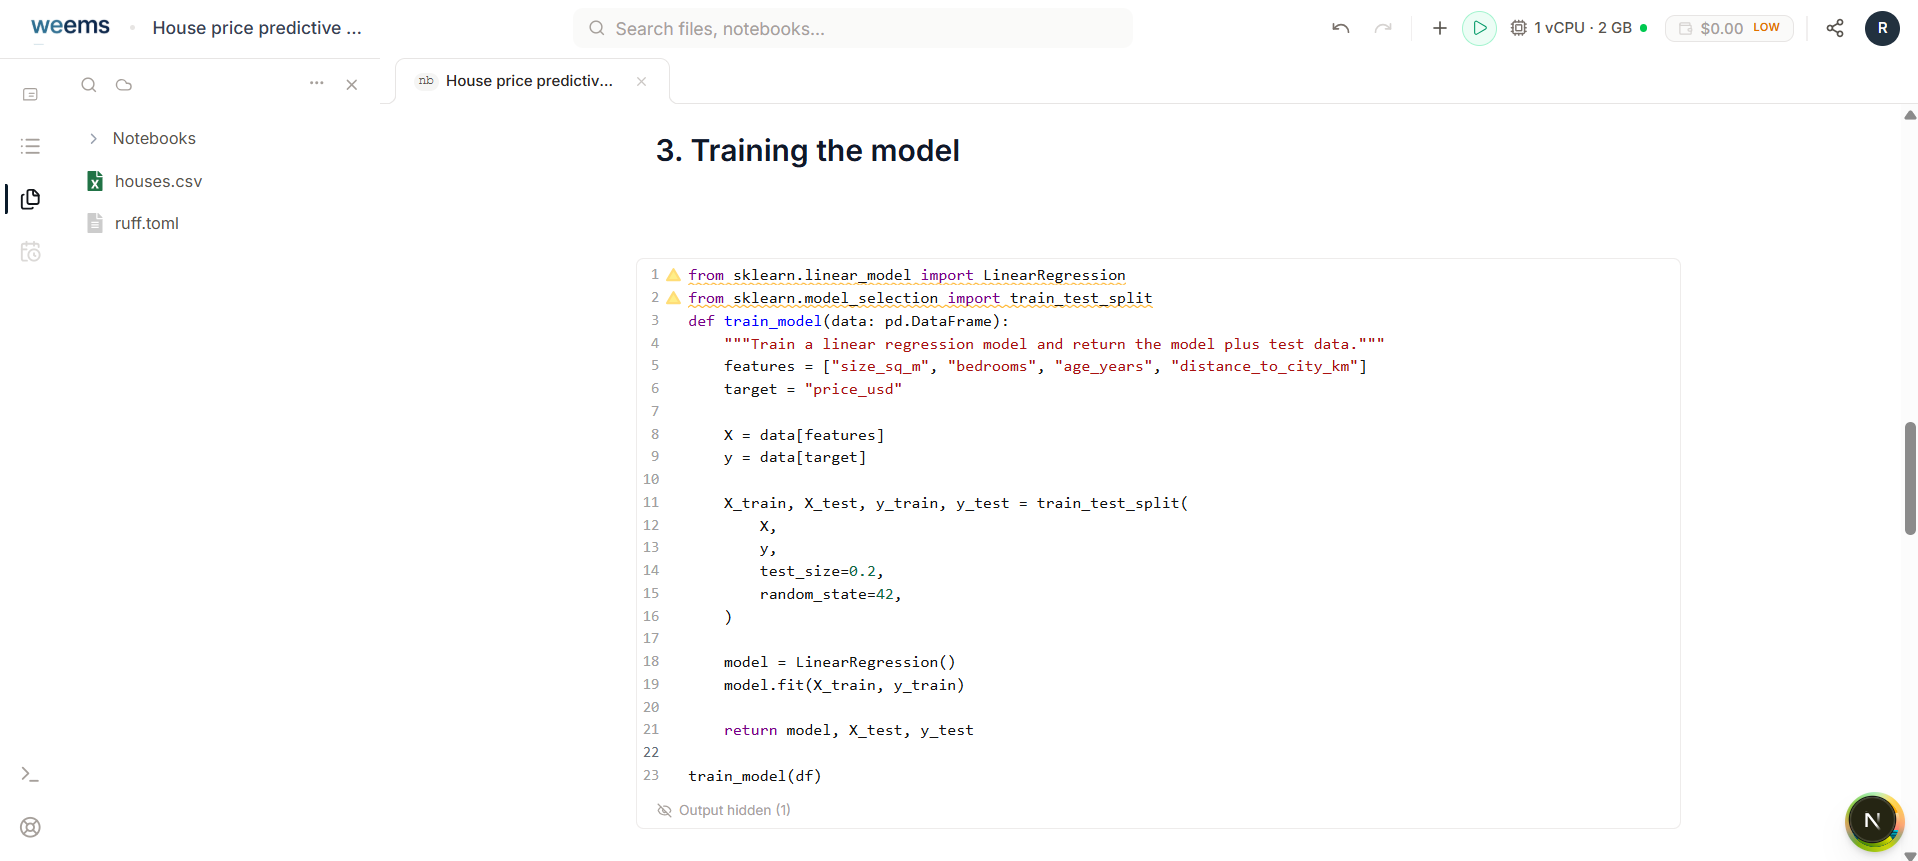
Train the model
Run the training code so the notebook splits the data, fits the model, and stores the trained estimator.
Training turns your notebook from data preparation into actual prediction work.
At this point the notebook has a concrete model that can be evaluated against the data you prepared.
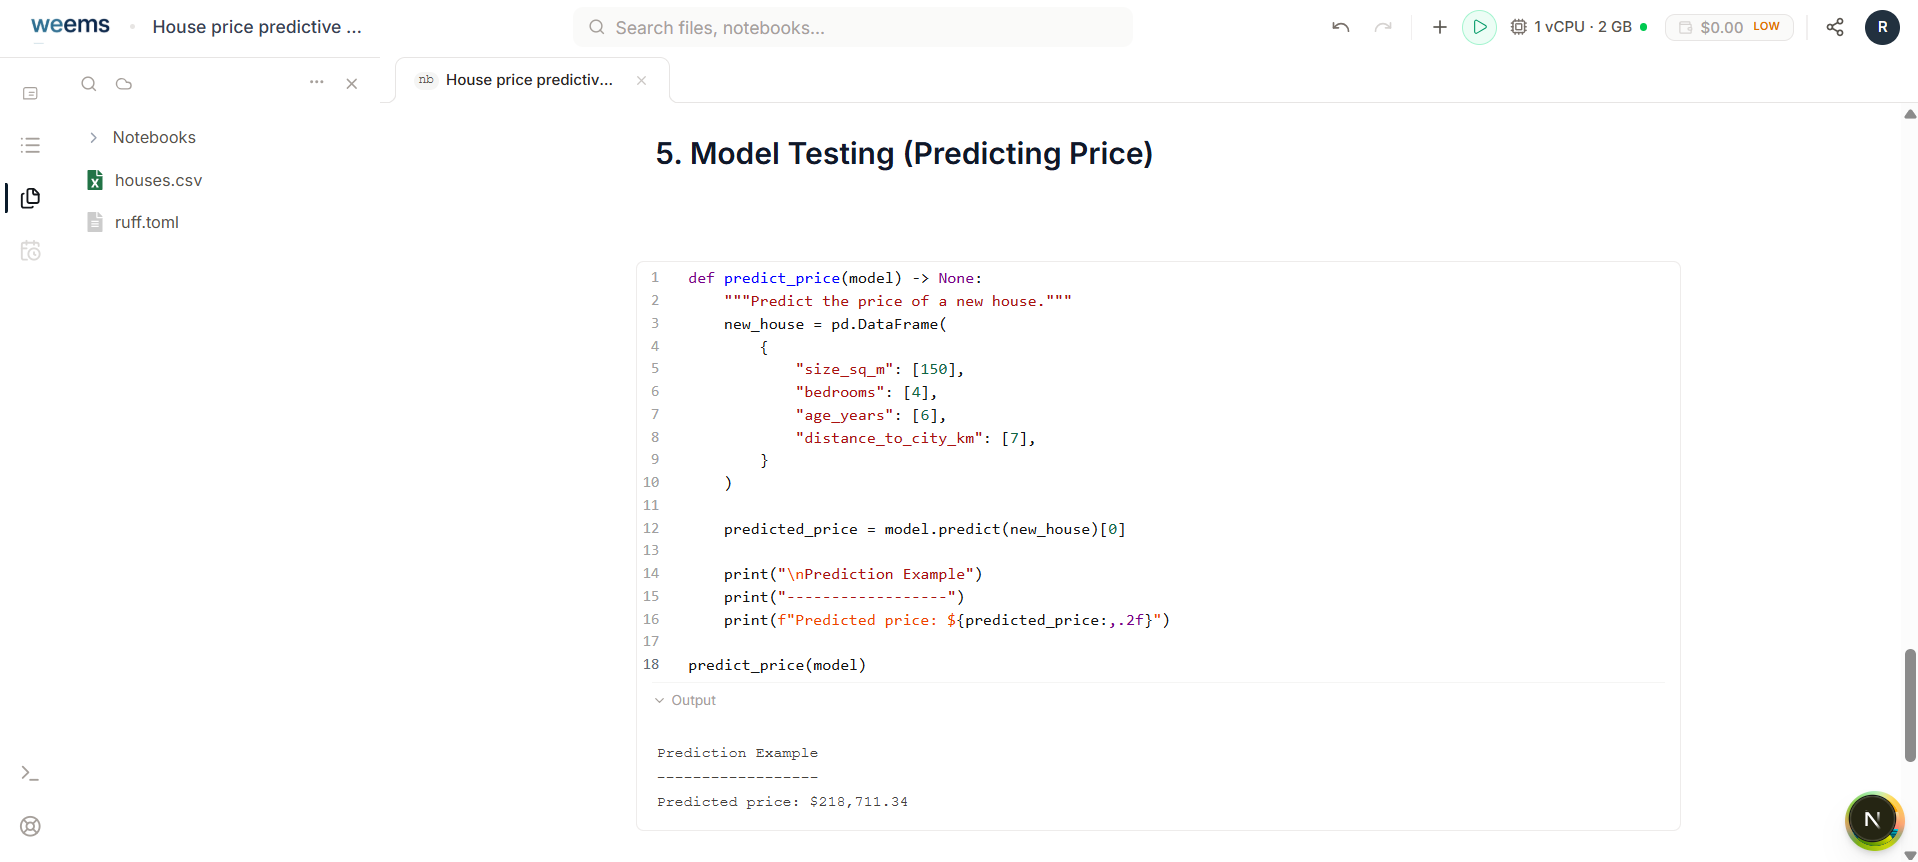
Test the model
Use the test code to predict the price of a new house and inspect the returned value in the notebook output.
A sample prediction gives you a tangible sense of how the trained model behaves.
This is the simplest check that the inference path works before you move on to metrics.
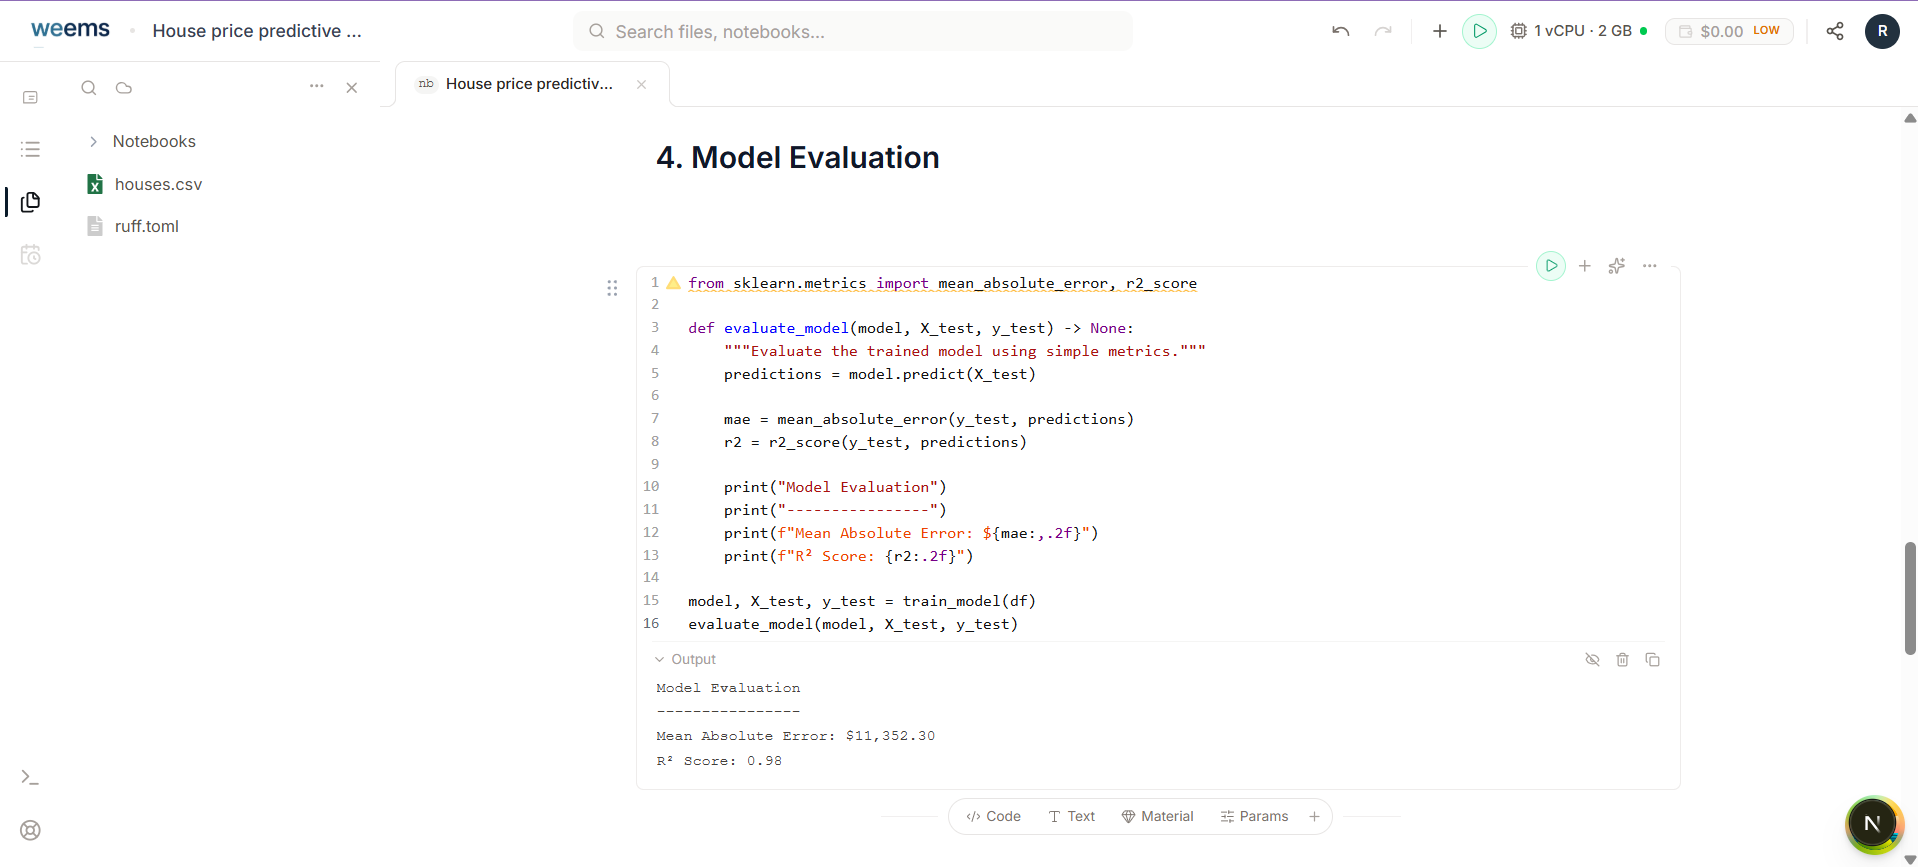
Evaluate the model
Run the evaluation code to compute the error and score metrics so you know how well the model performed.
Evaluation turns the notebook into a decision point. It tells you whether the model is useful or whether you need another pass.
Keep this step visible so the final answer is based on the data, not on the momentum of the workflow.
Use metrics, not guesses
Evaluation turns a working notebook into a trustworthy analysis by showing how the model performed. Decide whether the result is good enough from the metrics, not from the fact that the cell executed successfully.
Export and continue
Finish with a reusable notebook artifact and decide where to continue next.
Export the notebook
Use the export flow to save the completed notebook so it can be shared, archived, or reused later.
Exporting makes the project portable and gives you a clean artifact to continue from.
When you are done, you should have a notebook that captures the whole workflow in a form you can reuse later.
What to remember
Projects hold the working context. Canvas is where the notebook lives. Export gives you a portable artifact that you can share, archive, or revisit later.
What's next
- Canvas
Move into the notebook workspace when you are ready to edit and run work.
- Local Compute
Set up local execution if your project needs a machine on your own computer.
- Getting Started
Revisit the core mental model for projects, canvas, notebooks, and blocks.
- Schema Docs
Open the canonical materials reference when you need exact field and import behavior.
WEEMS Documentation
Product guides for projects, canvas workflows, and materials reference handoff.